• Home
  • Home
  • Home

Pages

9.29.2009

Lesson 3.5 With Martha (Chicken Piccata)


I am currently working my way thru the Meat, Fish & Poultry chapter of Martha Stewarts's Cooking School. Lesson 3.5 is all about how to Sauté and Fry. The key to sautéed foods is to cook in a sizzling-hot pan with a small amount of fat, cook your meats at room temperature in an even thickness, pat your meats dry to prevent "steaming" rather than browning, and don't overcrowd the pan. Stick with these basic rules and you can’t go wrong. What I like about this book is that it is not just a "how to cook book" but also an actual cookbook as well. Each lesson has a delicious recipe for you to showcase you newly acquire knowledge and skills and this lessons recipe was for Chicken Piccata.

Here is a recipe that I would have never in a million years thought to try. Not because I wouldn't have liked the bright lively flavors or the sheer elegant appearance of the dish. This type of Italian food was just not of my radar. When I think Italian, I think tomato. Usually a rich meat sauce or dice fresh tomatoes tossed in angel hair pasta, olive oil and parmesan. Certainly not lemons and capers. This dish was so unbelievable easy to make and the result where so delicious.

Interesting tidbit here. According to Chow.com, Chicken or Veal Piccata often thought to be a classic Italian dish actually originated right here in the US, in the 1930's Italian-American Kitchens. Piccata translates to piquant or piquancy, which in one definition means tart or zesty. Zesty and tart is exactly what this dish is with the combination of lemon juice, white wine, and capers. I did my best to try and track down the origin of the recipe to verify if Chow.com's Italian-American claim was correct, but had a hard time finding anything to back that up. Regardless of where it was created,  it is now one of my favorite Italian dishes. I will be making this again soon. Besides what else will I do with all those capers??

Chicken Piccata 
(Martha Stewart's Cooking School)

• 1/4 C all-purpose flour

• S/P
• 4 Chicken (or Veal) cutlets
• 2 Tbsp e-v olive oil
• 3 Tbsp unsalted butter
• 3Tbsp dry white wine
• 3 Tbsp fresh lemon juice
• 2 Tbsp salt-packed capters (soak and drain)
• 1 Tbsp chopped flat leaf parsley

In a shallow dish mix flour and s/p. Dredge chicken in flour and tap off any excess. Heat oil and 1 Tbsp butter in a large skillet over medium heat until butter starts to sizzle. Cook chicken in batches until golden brown on each side (2 to 3 min per side). Transfer the chicken to a platter and pour out any excess fat from the pan. Return pan to medium heat and add wine (I used a Pinot Grigio) and with a wooden spoon scrap up any browned bits. This is called deglazing the pan. Pan can be deglazed with chicken stock if you do not want to use wine. Continue cooking the wine until it reduces by half. (about 30 seconds). Remove pan from heat and add lemon juice, capers, and remaining 2 Tbsp butter. Swirl pan until butter is melted and sauce has combined, then add parsley. Immediately pour the sauce over the chicken and serve.

Over all a very easy recipe. The sauce does comes together really fast. Notice the ransacked cooking station. and yes I did finish the glass of wine with my meal.. ;)


Bookmark and Share


Enhanced by Zemanta

9.21.2009

Hey Pillsbury.. Great Crust (Turkey Pot Pie)

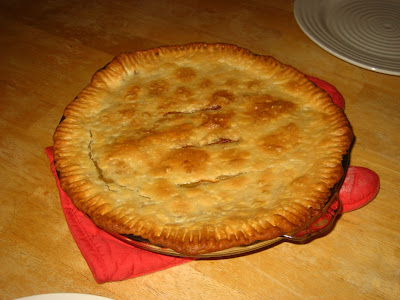
Look how pretty my Turkey Pot Pie looks! Jay said the crust was perfect! I told him it was Pillsbury and I will be sure to let him know... LOL.


Turkey Pot Pie


• 2 1/2 cups shredded cooked turkey
• 2 tbsp butter
• 2 tbsp flour
• 1 can chicken stock
• 1 carrot cut into coins
• 1/2 c green peas
• 1/2 c sweet corn
• 1 box Pillsbury pie crust.


In medium sauce pan melt butter and whisk in flour. Whisk for at least 1 minute to cook out flour taste. Slowing stream in chicken stock and continue whisking until gravy starts to tighten up. Add cooked turkey and veggies. Continue cooking on low until veggies are tender. Following directions on the pie crust box press one crust into the bottom of your 9-inch pie pan. Fill pan with turkey filling. Top with 2nd crust, folding the excess crust under and pinching edges with a fork. Cut a couple of slits in the top and bake at 425 degrees for 30 minutes. Cover edges of the crust with strips of foil half way thru baking time to prevent excess browning. Let pie rest for 10 minutes prior to serving.


Super Easy Supper!


Bookmark and Share
Enhanced by Zemanta

9.20.2009

How to store fresh herbs (Chimichurri)

I love cooking with fresh herbs like chives, cilantro, basil and parsley, but often time they are going south on me about 2 days after I purchase them. They end up soggy and wilted, resembling a science experiment rather than the bright green fragrant bunch I brought home from the store. What gives!


Storage, that’s what gives. I did my research and discovered I was going about it all wrong. I would pick out the best bunch, put it into the stores plastic produce bag and then put that directly into my crisper. By day 2 the whole bunch was going bad and by day 3 it all ended up in my trash. It is a wonder people avoid cooking with fresh herbs, the dried stuff is less trouble! But a few simple steps when you get home and you can save the bunch for the whole week.

Heres how:
• When you get home you should rinse off any pesticides or remaining dirt. Fill your sink or a large bowl with water, remove any rubber bands or twist ties, and swish them around to get them all cleaned off . Remove from water and give them a little shake to remove excess water. Pat them dry with a paper towel careful not to bruise or smash them. Lastly, lay them out on a dry paper towel to finish air drying while you put away the remaining groceries. Any moisture left on the leaves will promote decay and the whole bunch will be lost. (a salad spinner can be a great tool for drying herbs)

• Herbs that come in the small boxes are usually clean and ready to use. Simply put a small piece of paper towel in the box to help keep the moisture at bay.

• Once air dried lightly roll up herbs and place in a resalable ziplock bag.

• The best place to store herbs is your crisper usually set at the correct temperature of 40 to 45 degrees

• Each time you use the herbs during the week, be sure to inspect and remove any that look suspect. Replace the paper towel if it feels moist. This will ensure that you can get a full week out of them.

Here is a great recipe to use up those fresh herbs. Chimichurri, an Argentine green sauce that pairs well with grilled meats like chicken, steak or fish. Not just a garnish, Chimichurri also make a great marinade for your meats too.

Chimichurri

• 1/2 Bunch of flat leaf parsley (about a firmly packed cup)
• 4 Cloves of garlic
• 1 tbsp minced onion
• 1 tbsp red wine vinegar
• Juice of 1/4  of a lemon
• S/P to taste (about a pinch)
• Red pepper flake (about a pinch)
• 1 tsp dried oregano (optional)
• 1/2 c e-v olive oil

In your blender or food processor lightly pulse together parsley, garlic, and onion. Add vinegar, lemon juice, s/p, red pepper and if using oregano. Lightly pulse again to blend. While lightly pulsing stream in e-v olive oil just until mixed. Place in serving bowl and serve at room temperature. Sauce can be kept in the refrigerator in an airtight container overnight.


Bookmark and Share

9.19.2009

Good Morning Chocolate, So lovely to see you. (Chocolate Chip Pancakes)


Weekends were made for pancakes! Words to live by in my home. I love working with pancake batters. This simple quick bread hails from practically every region and culture of the world. From the Wild West American Flapjacks and the upper echelon of fruit filled French Crepes, to the ultra - light Russian Blini; the pancake has stood the test of time. The Roman "Alita Dolcia" (Latin for "another sweet") is mentioned in Apicius, an ancient Roman Cookbook. Only two copies of this cookbook, formally entitled De Re Coquinaria, are known to exist. A 9th century copy of the original 2nd century cookery manual, now resides in the Rare Book Collection at The New York Academy of Medicine's  Library.  The other 9th century copy resides in the Vatican library. The Acadamy's is older by a few years making it one of the worlds oldest cookbook. The pancakes as we know it today originated in Medieval Europe. You can have them sweet or savory by adding many different ingredients such as fruits, bacon, cheese, sour cream and chives. In addition to spices such as allspice, nutmeg, cinnamon, and extracts such as vanilla, almond, and peppermint. Whatever your heart desires, and this morning my heart desired chocolate!

Chocolate Chip Pancakes

• 2 c bisquick baking mix
• 2 eggs
• 1 1/3 c milk
• 1 tsp chocolate extract
• 1 c milk chocolate chips
• butter

Mix all ingredients into a mixing bowl. Pour 1/4 c batter per cake onto hot lighly buttered giddle. Once the edges are dry and cake is golden brown, flip cake and cook other side.   They will be lining up at the griddle with plates in hand and you will be the hero of the day!

Bookmark and Share
Enhanced by Zemanta

9.18.2009

Kick it up with Emeril (Sweet Corn Relish)

Kick it up with Emeril, Pg. 38 of the Sept. issue of Everyday Food, a Martha Stewart Magazine, has an amazing recipe for a Sweet Corn Relish. Since I gave poor Emeril such a hard time in my last blog I thought I would give him a little props for this recipe. It was incredibly easy and a refreshing side to my Shredded Beef Chimies and Ranch Beans. The flavors are so light with no fuss or muss, almost barefoot in its simplicity. It made a very nice light salad with what can sometimes be a heavy cuisine. Definitely a winner and I will make it again. Next time I may swap out the flat leaf parsley for cilantro to give it more of a Mexican feel.


Sweet Corn Relish

• 2 Cleaned ears of sweet corn
• 2 Vine-ripened tomatoes
• 2 Avocados
• 1/2 Small red onion
• 2 Tbsp finely chopped flat leaf parsley
• 3 Tbsp e-v olive oil
• 2 Tbsp fresh lemon juice
• S/P to taste


Cook your corn in a large pot of lightly salted boiling water. Once corn is done remove from water and set aside to cool slighly so that you are able to handle cobs while you cut off the kernals with a sharp knife. In a small bowl,  add diced tomatoes, diced avocados, finely diced red onion (I swapped out with 2 green onions and it was great),   and chopped flat leaf parsley. Add corn kernals, lemon juice, and e-v olive oil. Lightly toss, careful not to smash the avocados. Salt and pepper to taste.
Bookmark and Share


Enhanced by Zemanta

9.17.2009

Chicken Marsala

When asked to find a recipe, I don’t always marry the first one I see. In the spirit of dating I find 3 or 4 different recipes and read them thru. And just like every girl does, I take the best recipe and make gentle suggestions on how to improve it. While sometime the best recipe should just be left as it is... A little nudge toward a girls liking isn’t a bad thing either. In my research, I find that most of the time the "bones" of the different recipes are very similar, it is the little nuances that specialize the dish to each chef and/or sometimes the region. I often do a little research on the history behind the dish. Getting an idea about where it came from and what the story behind it is. Everything has a story behind it, finding that story is all part of the experience of cooking. It honors the dish and the ingredients that make it.


I was asked by a friend to find a Chicken Marsala recipe for her. It was one of her favorites and she wanted to make it at home. Having never had Chicken Marsala before, I was very excited to take on the task. I hit up Google and found a Ton of recipes. Everyone from Emeril Lagasse, known for his emphasis on Creole and Cajun cooking styles, ( ? ) to the expected Giada De Laurentiis, an Italian chef that was actually born in Italy, and every home cook in between had a different version of the recipe. Marsala is a wine produced in the region surrounding the Italian city of Marsala in Sicily. Sorry Emeril...I think Giada has you beat on this one. But I did use the garnish of chopped chives from his recipe so I guess everyone wins.


As I expected each recipe had the same general idea, a Marsala mushroom reduction sauce served over chicken. Some of the recipes called for Shallot or Sweet Onion. Others didn’t even have onion in the recipe. I found many recipes that called for heavy cream and one that suggested sour cream, while again there was a fair share of them that did not have cream at all. But all of the recipes called for mushroom, chicken stock and Marsala wine. Trusting these "bones" I followed the basic technique of the wine reduction sauce and took some inspiration from several of the recipes and came up with this.

Chicken Marsala

• 2 Chicken breast
• Olive oil
• Butter -1/2 stick
• 3 c Sliced baby bella mushrooms
• 1/2 Medium sweet onion
• 1 c Flour
• S/P to taste
• 1 tbsp Garlic powder
• 1/4 c Worcestshire
• 1/2 c Heavy cream
• 1 c Chicken stock
• 1/2 c Marsala wine
• Chives

Cut chicken breast in half and pounded into 2cutlets. Put into zip lock bag with Worcestshire while you finish prep work. In small bowl mix flour, salt and pepper to taste and garlic powder and set aside. Remove chicken from marinade and dredge chicken in flour mixture. In skillet brown chicken in about 1 tbsp olive oil and 1 pat butter. Bring heat up on pan slow so the butter does not burn. Remove browned chicken and set aside.
Add another pat of butter to the pan and add sliced mushrooms and onion. Toss to coat with the butter. Once mushrooms and onion are tender add the Marsala wine. Bring up to a boil and then reduce heat to med and let wine reduce by half. Stirring to get any browned bits to release from the pan.


Once wine is reduced add the chicken stock, cream and chicken back to the pan. Bring up to a boil again and then let simmer for about 6 min. Stir occasionally. (Just enough time to go and set the table).  Pull chicken out of sauce and plate on a nice platter or over cooked pasta add 2 more pats of butter to finish the sauce. And then pour over chicken.  Garnish with fresh cut chives.


Bookmark and Share

9.15.2009

I could never do your job! (Pot Roast)

My husband wanders into the kitchen at 8 am beckoned by the savory aroma of a pot roast searing in a black heavy cast iron pan and asks... "You starting dinner?" This not a question mind you, as he know darn well what I am making and there is a hint of contained excitement in his voice. Ahh …. Pot Roast!
I laugh and tell him. "Honey you could never do my Job. I have already studied spelling with our son, folded a load of laundry, made his lunch and now I am getting dinner started." He is smiling, chuckles a bit as he slips on his shoes and replies as any appreciative husband should. "Oh I know honey; I could never do your job" He leans over my shoulder and takes in another whiff of the tantalizing scents of peppered seared beef that is now resting in the crock pot. Bathing in a bath of beef stock, I arrange sweet onions and peppers over the meat. Another smile and with a kiss on the cheek he is out the door off to work.


Pot Roast
• Medium size well marbled Pot Roast
• Steak seasoning blend
• 1/4 c Worcestshire
• Olive oil
• 1/2 medium size sweet onion
• 10 small sweet peppers with stems    removed
• 2 cups beef broth
• 1 tsp butter (optional)
• 1 tsp flour (optional)
Season roast with Worcestshire and steak seasoning. Sear roast in a lightly oiled skillet for 1 to 2 minutes per side. Searing the meat helps to seal in and add rich flavors to the pan gravy. Once roast is seared transfer to a Dutch oven with a lid or Crock pot. Layer top of roast with sliced sweet onion and surround roast with sweet peppers. Fill the pot half way up the side of the meat with the beef broth. Set cooking temperature to low, cover and let the roast braise for 3 to 4 hours. If you want your roast falling apart the way my boys like it, let the roast braise for a longer time. Carefully remove roast and place on your serving platter. Tent with foil and let rest for at least 20 minutes. Remove any large pieces of gristle that may have fallen off the roast and with an emersion blender (a regular blender will work as well just be very careful handling the hot liquid) Puree onion and peppers into remaining braising liquid. Your gravy should be thickened by the pureed vegetables but if you need to thicken the gravy further you can thicken with a roux. In sauce pan over med heat melt butter. Once butter is melted add flour and whisk for 1 minute to cook out the flour taste but not brown the roux. Using a ladle slowing add in the braising liquid. Continue whisking until gravy tightens. Garnish vegetables such as carrot, potatoes or pearl onions can be added to the braising liquid 20 minutes prior to serving. Just be sure to remove them with the roast prior to finishing the gravy.
 
Note on How to Braise - When braising meats slow and low is the way to go. Your braising liquid should never boil but sit at a nice simmer. Many medium size roasts can be prepared in the morning on the way out the door and be glorious once you get home from work. Meat is done when you can stick a fork into the thickest part with ease and the meat shreds easily or falls off the bone.


Bookmark and Share
Enhanced by Zemanta

9.13.2009

Enter the Weekly Menu.

I cook the way most people look at a menu. I stand in front for my fridge with both doors wide open as if I am staring at a menu. Basking in the cool air as it flows over me, never mind the electricity I am wasting, I stare in and taking a mental inventory of what I have on hand. And just like you do when reading a menu, I study the dish options and pick out what "sounds good" to eat.


As a bit of a flibbertigibbet, I am not much of a planner. I can plan the big things in life, but sometimes the little things just get left to living in the moment. I love spontaneity, thus the menu style cooking habit. I have taken this same approach to grocery shopping. I would wheel my cart down each isle tossing in whatever "sounded good" from the stores shelves. There are some definite essentials that are purchased weekly, milk, eggs, butter, bread...ect. but beyond that, I usually ransack the isle and purchase a hodgepodge of ingredients. Then these items end up spending weeks in my pantry or refrigerator before I ever get around to preparing them, if at all.

Cooking and shopping in this manner can get to be a little pricey at the groceries store and turn you homes pantry and refrigerator into what resembles a mini grocery store. While in theory this would be great to have any ingredient you want readily available, in today's times, it just isn’t practical. We are all living on a budget and the thought of chucking spoiled food out in the trash or having a pantry item sitting on the shelf for months and months, is just like throwing good hard earned money away. That food would be better used at a local food bank or shelter instead of gathering dust or feeding the critters at the local dump.

So how do we take control of our food budgets and keep our kitchens properly stocked? Yep .. you guessed it ... Planning. (groan) But hear me out for a minute. Once you get your pantry and refrigerator stocked with the basic essentials and plan your weekly dinner choices, your trips to the grocery store will be much more productive and your panty won’t look like a small market. Not to mention your food budget will be reined in. If saving money and the recovered real estate in the pantry doesn't entice you into a little planning ahead, how about being able to eat premium cuts of meats and specialty ingredients. If you haven't blown your food budget on 20 different cans of soup that will take up residence in your pantry you can afford the nice plump shrimp or a marbled rib eye steak. With a little planning you can start to explore the pages of your cookbooks and plan to try something new.


Enter the Weekly Menu (with a bit of a twist)

In an effort to change my ways and still retain some of my spontaneity, I intend to embrace the Weekly menu method and invite you to join me. Here is the rub, plan a week’s worth of meals plus one pitch hitter. Each night you choose something off the list rather than assigning it to a specific day. Why the 8th extra meal? So that on the last day of the week you still have a choice of what to make for dinner. Go thru you cookbooks and food magazines to pick out 2 or 3 new recipes to try and throw in a couple of the old standbys the family enjoys.

Now that the menu is created, your next step is to create a shopping list. On the list is the additional ingredients needed to accomplish the 8 recipes along with any missing pantry/fridge essentials that need to be replenished. Below is my list of Essentials. It is a good place to start to stock your pantry. Just make sure your list does not have any specialty items on it, save those to be purchased on the week you intend to use them. I usually end the week with my trip to the grocery store so I can start the weekend with a kitchen full of fresh ingredients.

Pantry Essentials.

Flour
Sugar - Powder, Brown and White
Baking mix - Bisquick and Plain Muffin Mix
Cornmeal
Bread Crumbs - Plain and Panko
Stock - Chicken and Beef
Tomato Paste
Can Diced Tomatoes
Can Beans - Ranch, Pinto, Black,
Cooking Wine - Red and White (I use a good box wine for this as it is air tight and keeps longer)
Pasta - Spaghetti, Penne, Couscous, and Chow Mein Noodles
Rice- Basmati, Jasmine, Pilaf blend,
Oil - Veggie and Extra Virgin Olive Oil
Vinegar - Balsamic, White and Apple Cider
Bread
Quick Oats
Cereals
Coffee
Peanut Butter
Potatoes

Spice Cabinet Essentials

Pumpkin Pie Spice
Nutmeg
Cinnamon
Ground Ginger
Paprika
Cocoa
Corn Starch
Baking Powder and Soda
Sea Salt
Pepper - Black and White
Steak Seasoning Blend
Taco Seasoning Blend
Italian Seasoning Blend
Vanilla - Extract and Whole Beans

Fridge Essentials

Milk - 1%, Heavy Cream, Half/Half, Coffee Creamer
Sour Cream
Yogurt - Vanilla and other flavors
Butter
Eggs
Cheese - Parm. Mexican Blend, Cheddar
Jelly/Jam - Grape and Orange Marmalade
Maple Syrup
Salsa
Ketchup
Mustard - Yellow and Dijon
Chili Sauce
Sweet Chili Sauce
Hoisin
Soy Sauce
Worcestshire Sauce
Salad Dressing - Ranch and Vinaigrette
Bag Salad
Tomatoes
Carrots
Onions - Chives, Green Onion, Sweet
Lemon/Limes - Juice or Fresh
Frozen Veggies

9.07.2009

From my mothers kitchen to mine ...

Taste-testing the cookie dough with GrandmImage via Wikipedia Here I am, in my late 30’s; as if 40 isn’t breathing down my neck. Something about the "late 30’s" doesn’t sound as old as "almost 40". Anyhow back to the story; here I am in my late 30’s and if you asked me right now "When did you realize that cooking was part of your path" I wouldn't be able to answer that. To be perfectly honest with you, I am really not sure where my desire to cook and entertain came from. I have always loved cooking and the creative process of preparing and presenting a dish. Jay and I have always opened our doors to friends and family, hosting impromptu parties, not needing an excuse for any get together. Good friends and good food go hand in hand. Hospitality was just always something that came naturally to me and certainly not something I ever considered as my path.

I definitely don't have one of those heritage style cooking stories. You know those great stories of the young chef tugging at the apron strings of their grandmama as she added a pinch of this and a dash of that. Those little hands were begging to be part of the pure magic that only she could whip together. Listening intently she bestowed upon them the family secrets of the kitchen and the coveted family recipes known only by the select few lucky and worthy enough to be trusted. Knowing down to their core that food would be the center of their world and that they one day would be presenting a generous platter of grandmama's famous goodness to their family and friends and maybe even a restaurant of customers. Sadly, I didn’t grow up with grandparents in my life. one set of grandparents living much too far away and the other passing while I was too young to really remember them. My story is much more simpler and starts with my mother.

My mother was just like every other working mother of today, who avoided resorting to fast food and fed her children healthy meals everyday. Old reliables that could be cranked out in about 30 minutes after a long day of work. No disrespect to my mother cooking here. Some of those old reliables are my all time favorites and are always on special request whenever I come to visit.

Other then my high school home ecoomics class, I really don't have any formal instructions in cooking. I consider myself a 'self taught home chef'. Much of what I have learned such as how to hold a chef’s knife and what the various fresh herbs can be used for or paired with, is from hours and hours of Food Network shows and reading cookbooks. Silly as it sounds, instead of a sweet old grandmama bestowing upon me her grace and knowledge of the kitchen, I have an Ina Garten, Paula Dean, Bobby Flay, Martha Stewart, and Rachael Ray. I have also just recently taken to reading many of the cookbooks I have collected over the years and have started to purchase more. This last Christmas my mother gave me Martha Stewart’s Cooking School and I am pouring myself over the pages learning about various cuts of meat and cooking techniques. I have found my instructors and eagerly take in the lessons they teach hoping to someday have a young chef tugging at my apron strings as I add a pinch of this and a dash of that, begging to be part of the pure magic that only I could whip together.

While cooking has become my creative outlet, I truly believe it really isn't all that hard. If you can read and follow basic instructions you can cook. This is what I hope to do with this blog. I hope to inspire you to venture past your old reliable’s and try something new, maybe even teach you something too. I will always be a student in the kitchen, and as I continue to learn and be inspired, I hope to have you along as a guest at my table sharing in my foodie finds.

Deborah.

Enhanced by Zemanta
Related Posts with Thumbnails
 
Website Templates by Body Fat Caliper, Christmas Dress